
This article is the 3rd of the series on Azure DevOps Boards for Dynamics 365 or the Power Platform and covers my approach to requirements life cycle in Azure DevOps Boards.
If you have missed my previous articles about Azure DevOps Boards for Dynamics 365 or the Power Platform, you can take a look at how I typically structure and capture requirements using Azure DevOps Boards.
As stated in my previous articles, new requirements are being added throughout your agile project while existing ones will follow a life of their own. New requirements can originate from many different sources, like new ideas, improvements to existing systems, dev showcases, etc.
So, what happens to a new requirement once it has been captured in Azure DevOps?
What is the requirement lifecycle and what’s the best way to manage a requirement from its infancy into being promoted to production where it will deliver business value to our users?
Requirement Stages
if you are starting a new project, you might be given a list of requirements that got created by your clients.
It’s also possible that you have been asked to help your clients define their requirements during an Ideation or Discovery phase. If you don’t know where to start with helping your client create an initial product backlog, you can read the following articles:
- Gathering & Defining Power Platform Requirements by Hamish Sheild: Where Hamish describes his framework to gather and define requirements using Observations, Journey Maps and Swimlane Process Diagrams.
- Value Stream Mapping – For your Dynamics 365 or Power Platform project: The Value Stream is the perfect tool to start building your initial list of requirements and create your Product Backlog. When creating the Value Stream, we identify the key actions that take place from the initial client interaction to the realization of value.
Now, let’s go in detail through each of the User Story states that I use to manage my requirements in Azure DevOps Boards.

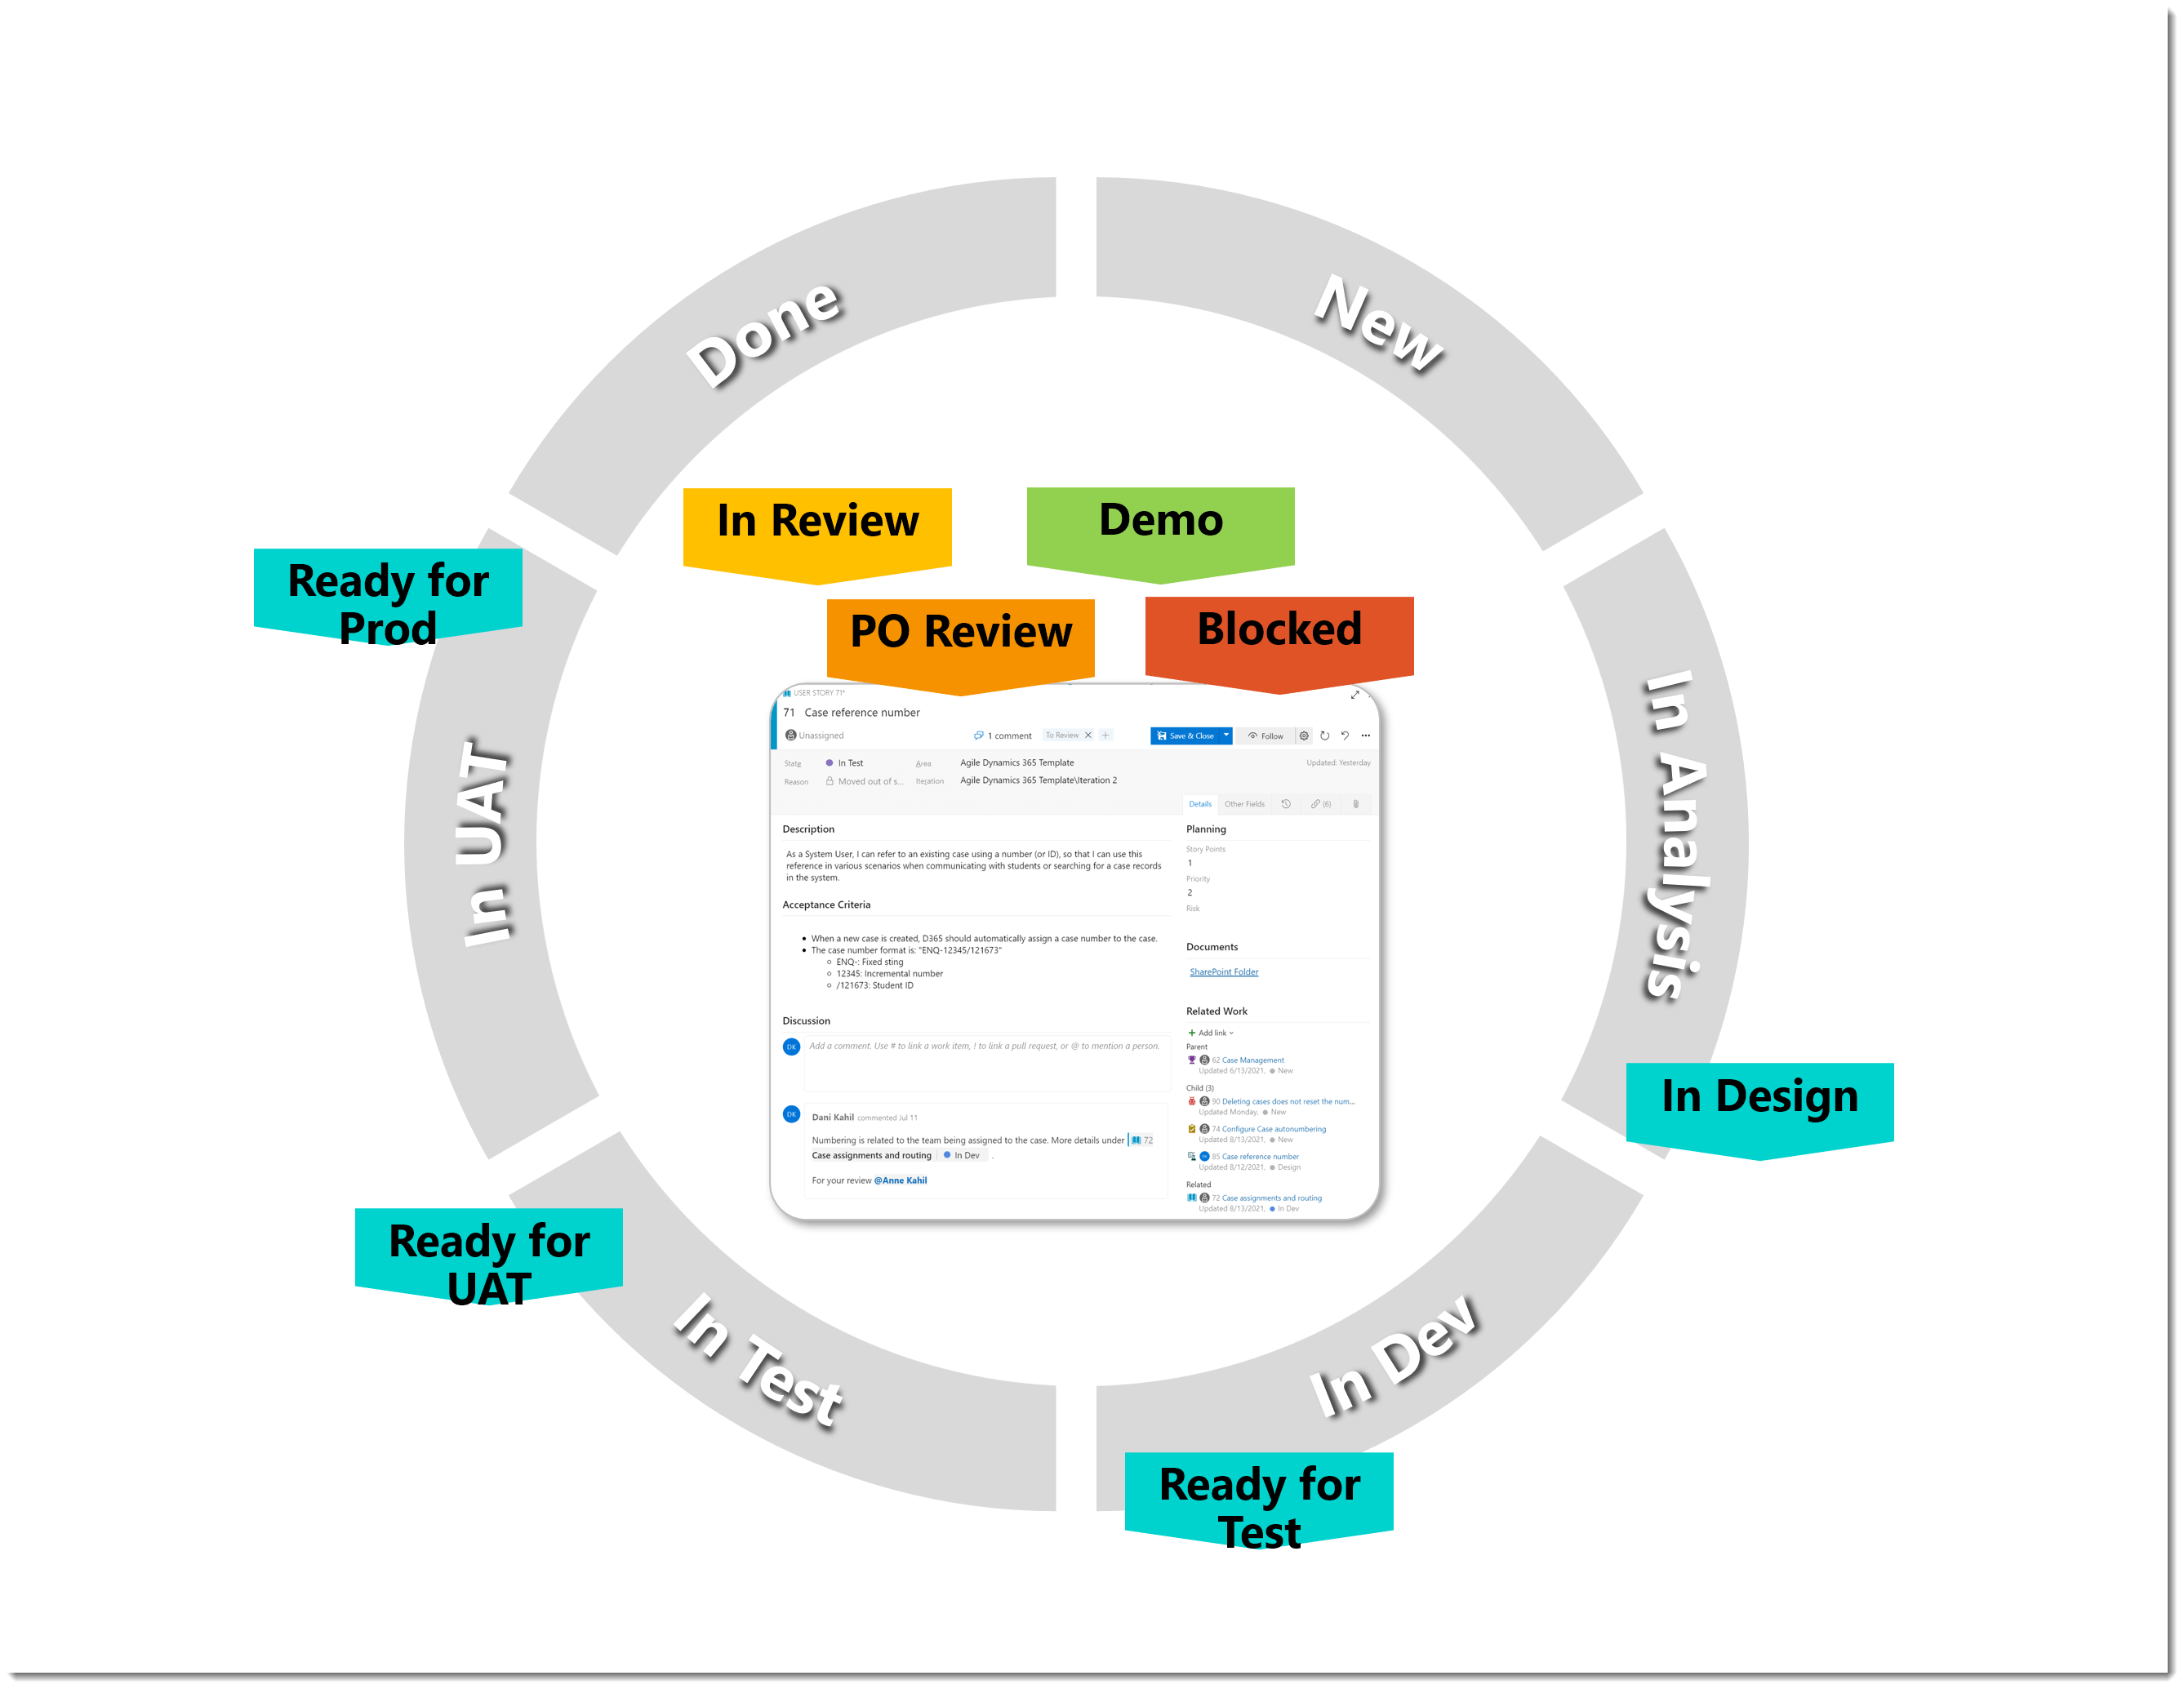
New
When a new requirement is identified, log it in DevOps as a User Story. Ideally you want to have a requirement structure so that you can create the requirement under the correct Epic and/or Feature.

For new requirements, I recommend you create it with a minimum amount of information to start with. Unless you are a Product Owner yourself, chances are that the new requirement will need to be reviewed and approved by the Product Owner before it can be analyzed.
So don’t spend hours describing the requirement just yet. Instead, create the requirement and bring it to the attention of your Product Owner so that it can be reviewed. Those are the fields I usually fill in for new requirements:
- Title: Short title for the requirement
- State: The State of the User Story. So, in this case, your state is NEW.
- Priority: Helps to make sure that high priority items get addressed first.
Once your Product Owner decides that the requirement is worth progressing, you can move to the next stage.
In Analysis
This is where you typically spend more time understanding the details of the requirement. I typically have the following activities happening at this time:
- Conversations & Workshops: Discuss and workshop the requirement with the Product Owner and/or Business Analyst. Go into specific processes and rules and document those into the Acceptance Criteria.
- Demo: During workshops you can demo the “Out of the box” features available in Dynamics 365 or the Power Platform to meet the requirement. Helping the Product Owner and/or Business Analyst visualize how the requirement might be met using the Platform will help them provide you the details you need for your dev work.
- Prototyping: If the requirement can’t be met with “Out of the box” features, you can take more time to think about other solutions to meet the requirement. A prototype can then be used to help you, the Product Owner and BA image what a solution could look like.

In Analysis, I would typically capture the following information under the User Story:
- State: The state of the User Story goes to IN ANALYSIS
- Description: Description of the User Story written in the format of “As a [Role], I want [Action]… so that [Benefit]”.
- Acceptance Criteria: Additional details to help you confirm a shared understanding and agreement of the story. I usually limit my acceptance criteria to a list of maximum 10 bullet points.
- Discussion: Use the discussion section to add comments and summarize discussions as the story evolves over time. Ex: SMEs and BA’s can propose additional Acceptance Criteria or ask clarification questions that I need to consider for the development of the story.
- Related Work: You can link other work items to manage dependencies and see relationships:
- Parents: Helps you link the story to a parent Feature of Epic.
- Related: You can create relationship with other existing or new stories. Each time you tag another story using the “#” hashtag, that story will be added to the Related section.
- More info on Microsoft Docs about how to Link user stories, issues, bugs and other work items
- Tags: Tags can help with filtering or categorization of User Stories.
In Dev
When we get to a shared understanding of what the requirement is, it’s time to plan the Dev work.
We usually estimate the Story in Story Points to understand the complexity of the story. The goal of the estimation is to uncover any potential misunderstanding between Devs and make sure that we are all more or less aligned on the complexity of the requirement.
Estimating the Story also helps with capacity planning during sprint planning.

This is where your User Story get updated with the following:
- Child Tasks: Analysis, Design or Build tasks are created so that the team can deliver the story.
- Story Points: Adding Story Points to your User Story helps estimate the amount of work required to complete the User Story.
- Discussion: Where you can capture additional details and feedback while you showcase the dev progress to your product owner.
All other States

In TEST:
This is where the internal testing happens. Usually, a dedicated consultant or tester will create and execute the Test Cases for each User Story. The goal is to identify any issues so that the Dev Team can quickly fix before deploying it to UAT.
Manual test cases are usually created to help check that each User Story meet the Acceptance Criteria defined to meet the user’s requirements.
Further discussions are happening between team members regarding the test progress or to clarify any misunderstanding about the requirement.
IN UAT:
When the unit testing is done, the User Story moves to the UAT Environment where it is tested by a dedicated team. UAT Test Cases are executed, and Bugs are created if issues are found. If a User Story needs significant rework, the state can be updated back to IN DEV.
UAT is also where new User Stories often emerge. While testing the delivered features, SMEs come up with new ideas for improvement. Unless it’s a minor/cosmetic change (like a label change or a new field without logic behind it), the idea should be created as a NEW User story and will have a life of its own.
DONE:
It’s time to celebrate!!!
When the Product Owner signs off the User Story after UAT, it can now be deployed into Production where end users can benefit from the business value that the requirement is delivering.
This is where you would close the User Story as Done.
Configure stages in Azure DevOps
To configure your specific states in Azure DevOps, you will need to make customizations to processes. Follow the Microsoft Docs on how to Customize a workflow.
Using Tags in Azure DevOps
Tagging work items helps you quickly filter the product backlog or a work item query by categories that you define. A tag corresponds to a one or two keyword phrase that you define and that supports your needs to filter a backlog or query, or define a query. More info on Microsoft Docs.
On my projects I often use the following tags to complement the state and help me manage requirements.
- General tags independent of states:
- In Review: Indicates that the Story needs to be reviewed / discussed at the next workshop or meeting with the Product Owner and / or the BA.
- PO Review: Indicates that the Story can now be reviewed by the Product Owner. This is to get approval for the story to progress from New to In Analysis or from In Analysis to In Dev.
- Demo: Indicates that I have done my Analysis, Design and Prototyping and I can showcase how I am intending to deliver the story using Dynamics 365 features.
- Blocked: Indicates that we can’t progress on the story because of external factors. Ex: The story might be dependent on an ISV that needs to be purchased or the requirement is too complex and might required a contractual discussion to progress.
- When state is In Analysis:
- In Design: Indicate that I need to do some design & prototyping on the User Story.
- When state is In Dev:
- Ready for Test: Indicates that the Dev work is done and that the Story is ready to be picked up by the tester to start testing.
- When state is In Test:
- Ready for UAT: Indicates that the Testing is done, and the story can be moved to In UAT.
- When state is In UAT:
- Ready for Prod: Indicates that the story passed UAT, and is now ready to be deployed in Prod.
Managing Requirements using the Board:
Once you have configured your states and your tags, you can better track your User Story lifecycle using the Boards.
Your Kanban board provides you with a visual interactive space for you and your team to plan and show progress. Your team can use it to track the critical information they need by seeing which work items are in progress, where the bottlenecks are, who work is assigned to, and more.
Columns (Doing & Done)
In order to map your User Story states to the Azure Kanban board, you will need two add additional columns. Here are more details about how to add columns.
Customize Card colors & Tags colors
I would also recommend that you take the time to configure the look and color of your cards and tags to help you quickly identify your next best action for them. Check out this document on how to customize cards.
Below is an illustration of what one of my Kanban boards would look like with additional columns, card color and tag colors.

What’s next
Below are the related articles to this series:
- Azure DevOps Boards for Dynamics 365 or the Power Platform – Part 1 – STRUCTURING REQUIREMENTS
- Azure DevOps Boards for Dynamics 365 or the Power Platform – Part 2 – CAPTURING REQUIREMENTS
- Azure DevOps Boards for Dynamics 365 or the Power Platform – Part 3 – REQUIREMENTS LIFE CYCLE (This article)
Let me know in the comment section below if there are any other topics, related to Azure DevOps Boards, that you would like me to write on.
Pingback:Azure DevOps Boards for Dynamics 365 or the Power Platform – Part 1 – STRUCTURING REQUIREMENTS – Mastering requirements and solution envisioning for Microsoft Business Applications